Electricity Tutorial
Atom, Electron & Electricity:

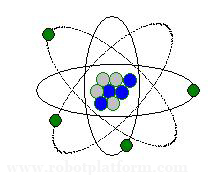
Everything starts from an atom and all matter on earth is made up of atoms. An atom is the basic building block of all matter. Figure in the right depicts an atom structure. It contains a central core called the nucleus. Nucleus contains protons which are positively charged and neutrons which are neutral. Although protons are positively charged, net electric charge of a stable atom is zero. This is because revolving around a nucleus is an electron cloud which contains electrons that are negatively charged. Protons and electrons are mutually bound by their electrical attraction.
This is just a brief description of an atom. Atomic theory and structure of an atom is described in depth in another article. Read Atomic theory for details...
Let us consider Hydrogen and Copper atom. Hydrogen atom contains 1 proton and 1 electron. Charge in each proton corresponds to the charge in an electron. Likewise, Copper atom contains 29 electrons and 29 protons. Hence the net electric charge of these two atoms is zero.
Atoms can gain or lose electrons. When an atom gains an electron, it is said to be negatively charged and when it loses an electron, it is said to be positively charged. When this happens, an atom is called an ion. A negative ion is attracted towards a positive ion. Similarly, a larger object with negative charge is attracted towards an object with a positive charge. When you remove an electron from an object and give it to another object, they possess opposite charge and attract.
This is what happens when you comb your hair, especially on a dry day. Electrons are passed from the hair to the comb. This makes your hair positively charged making them push against each other, and the comb negatively charged. Similarly, when you walk on a carpet and touch your door knob, electrons from the carpet are passed to you. This is discharged when you touch your door knob, and *psst* you get a shock.
This is known as static electricity.
Note:
- Since protons repel against each other, how can more than one proton stay within the nucleus?
- There is a strong binding energy between the protons within the nucleus which is strong enough to overcome the repulsion.
- If protons and electrons attract, do they not come towards each other and collapse?
- The electrons are kept in the orbit due to centrifugal force between them. To keep things simple, imagine an electron to be moon orbiting around our earth balanced by a centrifugal force and the gravitational pull.
Electrons can also be passed to / removed from an object by chemical reaction. This is what happens within a cell (Since battery is a commonly used term, we use battery henceforth)
Battery contains three parts:
- A positive terminal
- A negative terminal
- A chemical separating the two terminals, called an electrolyte
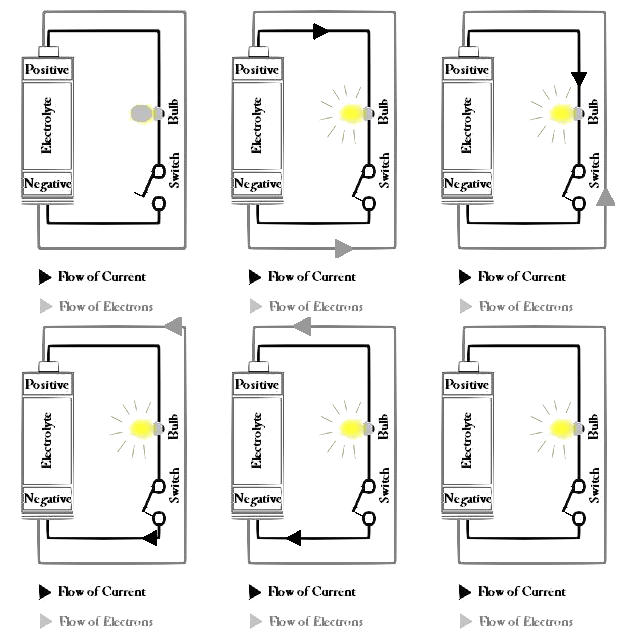
When positive terminal and the negative terminal of a battery are connected through a circuit, a chemical reaction takes place in the electrolyte which builds up electrons at the negative terminal. The result is an electrical difference causing electrons to flow from negative terminal towards the positive terminal, which causes an electric flow through the circuit.
Note: Some text books and websites also refer to positive terminal as Anode and negative terminal as cathode. Since there are some fallacy in this, we will avoid using these terminologies and use +ve (positive) and –ve(negative) wherever required.
If electrons flow from negative to positive, why do we say that current flows from positive to negative?
When electricity was discovered, they chose the convention that current flow from positive to negative terminal, i.e. positive charge moves towards the negative charge. Although this is not true, in those days, it was difficult to identify the electron flow and judgments had to be made. Hence they chose this convention. Assuming this way of flow is called conventional current.
Since all laws are analyzed and circuits are designed based on conventional current, we prefer the same principle in all our circuits. However, do note that sometimes we need to refer electron flow when analyzing few elements like transistor or capacitor. For your understanding, electron flow and conventional current always flow in opposite direction.
Do not connect the battery terminals without a load (like a bulb / motor). It is dangerous and there are also chances of destroying the battery
Do you have anything to say?
Visit the Forum to discuss, learn and share anything related to robotics and electronics !!


